Code Learn OpenGL Chapter2
OpenGL第二章
因为第一章写了一万多字Typora就开始有点卡了,所以决定一章一个文件,从现在开始第二章就逐渐进入光照的介绍了。
颜色
OpenGL里对颜色的处理是符合生活常理的,即:眼睛看到的颜色是物体拒绝吸收的光的颜色,也就是说一个蓝色的物体其实是它拒绝吸收蓝色。
当我们把光源的颜色与物体的颜色值相乘,所得到的就是这个物体所反射的颜色(也就是我们所感知到的颜色)。
glm::vec3 lightColor(1.0f, 1.0f, 1.0f);
glm::vec3 toyColor(1.0f, 0.5f, 0.31f);
glm::vec3 result = lightColor * toyColor; // = (1.0f, 0.5f, 0.31f);
基础光照
现实中的光照非常复杂,出于性能考量,我们在OpenGL中使用的是简化的光照模型,其中一个常用的模型叫做冯氏光照模型(Phong Lighting Model),这种模型由三个分量组成:
- 环境(Ambient)
- 漫反射(Diffuse)
- 镜面(Specular)
环境光照
float ambientStrength = 0.1;
//常量环境因子
vec3 ambient = ambientStrength * lightColor;
漫反射

漫反射的原理是,光照越垂直一个物体,它对物体的影响会越大,为了测量这个垂直程度,我们要用到法向量,正如先前所说,两角点乘越接近1,它们的夹角越小,这里用的就是这个原理。
vec3 norm = normalize(Normal);
vec3 lightDir = normalize(lightPos - FragPos);
float diff = max(dot(norm, lightDir), 0.0);
//如果两角为钝角,点乘会返回负数,但是这不是我们想要的结果
vec3 diffuse = diff * lightColor;
在万事大吉之前,还有一件事要注意一下,还记得我们处理模型位置的时候,第一步做了什么吗?从模型空间转换到世界空间。既然模型位置需要转换,法向量要不要转换呢?答案是要。
但是和位置信息不一样,法向量是一个向量,正如定义,向量包含位置信息,所以:
- model矩阵的位移操作应该被去除。
- 我们应该专注于缩放和旋转变换。
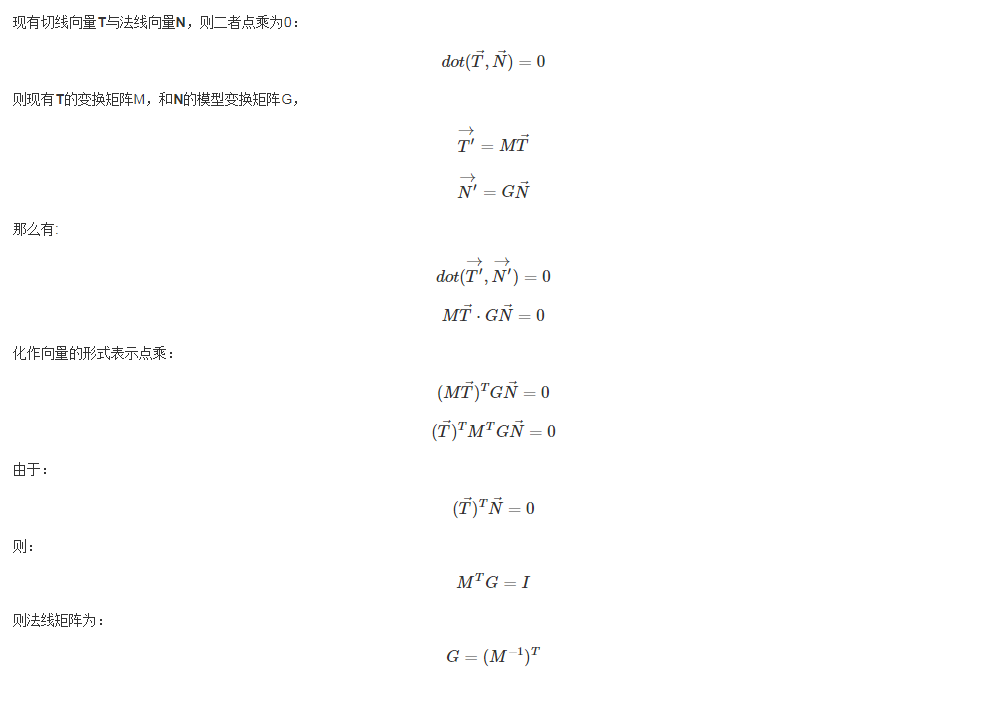
不过如果模型执行了不等比的缩放,会导致法向量不再垂直于表面,为了纠正这个问题,我们使用法线矩阵(Normal Matrix)。
![]()
法线矩阵实质上是模型矩阵左上角的逆矩阵的转置矩阵,在顶点着色器中我们可以自己生成这个矩阵:
Normal = mat3(transpose(inverse(model))) * aNormal;
//            转置矩阵   逆矩阵   模型矩阵
关于矩阵的证明,这里给出网上找的一幅图,个人觉得解释的不错:
镜面光照
所谓镜面光照其实就是高光(Specular Highlight),它的原理如图,结合生活常识应该不难理解:
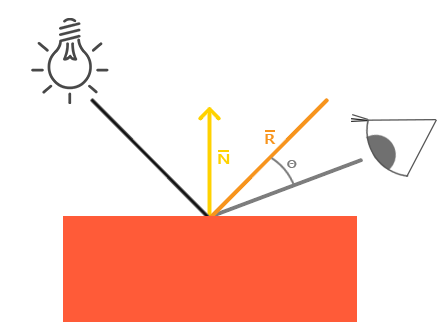
最终高光呈现出来的效果是,夹角越小,镜面光越强烈。
float specularStrength = 0.5;
//镜面强度
vec3 viewDir = normalize(viewPos - FragPos);
//算出入射向量
vec3 reflectDir = reflect(-lightDir, norm);
//算出出射向量,在漫反射的时候我们算的lightDir是从镜面出发到光源位置,所以这里要取反
float spec = pow(max(dot(viewDir, reflectDir), 0.0), 32);
//32指代反光度,反光度越大,散射越少
//这部操作还算了出射向量和观察向量的角度
vec3 specular = specularStrength * spec * lightColor;
算出三个光,我们再将它们汇总,这样就算出了最后的冯氏着色:
vec3 result = (ambient + diffuse + specular) * objectColor;
FragColor = vec4(result, 1.0);
这节的最后再提一下Gouraud着色,Gouraud着色本质是再顶点着色器实现的冯氏着色,相比片段着色器来说,顶点着色器要处理的顶点要少很多,所以Gouraud着色会更加高效,但因为顶点少了,更多的地方要通过线性插值来计算光照颜色,这样处理的光照可以说是靠猜,就不够真实。
材质
对于不同物体,它们会有不同的“反光度”,通过对光的反射,这些属性会让物体呈现出不同的效果,具体来说,这些属性分为:
#version 330 core
struct Material {
    vec3 ambient;
    //环境光反射颜色
    vec3 diffuse;
    //漫反射物体颜色
    vec3 specular;
    //镜面光照颜色影响
    float shininess;
    //高光的半径
};
//请注意这里的反射颜色是vec3,方便控制对于每个颜色通道的反射程度

uniform Material material;
改了材质,我们再将光照强度细分为每个通道颜色的强度,请注意区分材质和光照强度,材质是对反射颜色的描述,而光照是对各个颜色的光照强度的描述:
struct Light {
    vec3 position;

    vec3 ambient;
    vec3 diffuse;
    vec3 specular;
};

uniform Light light;
更改完之后,本来的代码应该改成:
vec3 ambient  = light.ambient * material.ambient;
//可能有人会疑惑,light.ambient是一个向量,material.ambient也是一个向量,为什么两个向量相乘不是一个数字,而是另外一个向量呢?
//这里就要区分向量的三种乘法了,在OpenGL中'*'表示的是Hadamard乘法,也就是每一个分量之间相乘,具体操作很像向量加法,而向量点乘用的是dot()函数,向量叉乘是cross()函数
vec3 diffuse  = light.diffuse * (diff * material.diffuse);
vec3 specular = light.specular * (spec * material.specular);
//可以看到,光照强度的向量代替了之前的float类型的强度的位置
下面附上完整代码,结合这两张内容,相信不需要注释你也能看的懂:
#version 330 core

in vec3 Normal;
in vec3 FragPos;

out vec4 color;

struct Material {
 vec3 ambient;
 vec3 diffuse;
 vec3 specular;
 float shininess;
};

struct Light {
 vec3 position;
 vec3 ambient;
 vec3 diffuse;
 vec3 specular;
};

uniform vec3 viewPos;
uniform Material material;
uniform Light light;

void main(){
 float ambientStrength = 0.1;
 float specularStrength = 0.8;

 vec3 ambient = light.ambient * material.ambient;

 vec3 lightDir = normalize(light.position - FragPos);
 vec3 norm = normalize(Normal);
 float diff = max(dot(norm, lightDir), 0.0);
 vec3 diffuse = light.diffuse * (diff * material.diffuse);

 vec3 viewDir = normalize(viewPos - FragPos);
 vec3 reflectDir = reflect(-lightDir, norm);
 float spec = pow(max(dot(viewDir, reflectDir), 0.0), material.shininess);
 vec3 specular = light.specular * spec * material.specular;

 vec3 result = ambient + diffuse + specular;
 color = vec4(result, 1.0);
}
光照贴图
上面的光照贴图确实很好的反射了光照,但是现实生活中一个物体可能会以不同的方式反射光,因为物体的每个部分材质贴图都是不同的,所以我们接下来要引入漫反射和镜面光贴图。
漫反射贴图从原理上来说就是一个纹理,在着色器中使用漫反射贴图的方法也和纹理贴图一样,此处我们把它也加到Material中:
struct Material {
    sampler2D diffuse;
    //这里补充一点不透明类型的知识,如果要把不透明类型声明到结构体种,那么这个结构体必须要被声明为uniform,详见:https://www.khronos.org/opengl/wiki/Data_Type_(GLSL)#Opaque_types
    vec3      specular;
    float     shininess;
};
...
in vec2 TexCoords;
C++代码没有变多少,不过还是展示一下封装过的加载贴图代码:
unsigned int loadTexture(char const * path)
{
   unsigned int textureID;
   glGenTextures(1, &textureID);

   int width, height, nrComponents;
   unsigned char *data = SOIL_load_image(path, &width, &height, &nrComponents, 0);
    //请注意这里最后一个参数是0,表示我们不限定load图片的通道数
   if (data)
   {
       GLenum format;
       if (nrComponents == 1)
           format = GL_RED;
       else if (nrComponents == 3)
           format = GL_RGB;
       else if (nrComponents == 4)
           format = GL_RGBA;

       glBindTexture(GL_TEXTURE_2D, textureID);
       glTexImage2D(GL_TEXTURE_2D, 0, format, width, height, 0, format, GL_UNSIGNED_BYTE, data);
       //因为没有限定load图片的通道数,这里的格式也需要自适应了
       glGenerateMipmap(GL_TEXTURE_2D);

       glTexParameteri(GL_TEXTURE_2D, GL_TEXTURE_WRAP_S, GL_REPEAT);
       glTexParameteri(GL_TEXTURE_2D, GL_TEXTURE_WRAP_T, GL_REPEAT);
       glTexParameteri(GL_TEXTURE_2D, GL_TEXTURE_MIN_FILTER, GL_LINEAR_MIPMAP_LINEAR);
       glTexParameteri(GL_TEXTURE_2D, GL_TEXTURE_MAG_FILTER, GL_LINEAR);

       SOIL_free_image_data(data);
   }
   else
   {
       std::cout << "Texture failed to load at path: " << path << std::endl;
       SOIL_free_image_data(data);
   }

   return textureID;
}
片段着色器只需要小改动:
vec3 diffuse = light.diffuse * diff * vec3(texture(material.diffuse, TexCoords));
vec3 ambient = light.ambient * vec3(texture(material.diffuse, TexCoords));
虽然这下立方体有颜色了,但是却很假,因为木头是不应该有高光的,但如果直接把高光的材质设为0,那金属框也不会反射高光了,这个时候我们就需要引入镜面光贴图了。

镜面高光的强度取决于每个像素的亮度,这个像素约白,那它反射高光就越强,可以看到木头是不反光的,所以中间都是黑的。
除了镜面发光,我们还可以做放射光贴图,也就是自发光的效果,贴图如下:

明白这些贴图各自的作用后,我们回顾一下在循环中怎么传贴图:
while (!glfwWindowShouldClose(window)){
   fflush(stdout);
   currentFrame = glfwGetTime();
   deltaFrame = currentFrame - lastFrame;
   lastFrame = currentFrame;
   glfwPollEvents();
   pos_update();
   glClearColor(0.2f, 0.3f, 0.3f, 1.0f);
   glClear(GL_COLOR_BUFFER_BIT | GL_DEPTH_BUFFER_BIT);

   mat4 view = mat4(1.0f);
   view = camera.GetViewMatrix();
   mat4 projection = mat4(1.0f);
   projection = perspective(camera.Zoom, (float)WIDTH/(float)HEIGHT, 0.1f, 100.0f);
   vec3 lightPos(1.2f, 1.0f, 2.0f);
   vec3 resize(0.5f);

   glBindTexture(GL_TEXTURE_2D, texture);
    //这里省略了激活Texture0的代码,因为如果没有还没有激活别的贴图,那么默认当前的激活Texture就是0

   glActiveTexture(GL_TEXTURE1);
    //切换当前激活Texture为1并绑定对应贴图
   glBindTexture(GL_TEXTURE_2D, texture1);

   glActiveTexture(GL_TEXTURE2);
   glBindTexture(GL_TEXTURE_2D, texture2);

   myShader.Use();
   myShader.setMat4("view", view);
   myShader.setMat4("projection", projection);
   glBindVertexArray(VAO);
   mat4 model = mat4(1.0f);
   myShader.setMat4("model", model);

   myShader.setInt("material.diffuse", 0);
   myShader.setInt("material.specular", 1);
   myShader.setInt("material.emission", 2);
    //这里告诉对应sampler它的采样目标是Texture几
   myShader.setFloat("material.shininess", 64.0f);


   myShader.setVec3("light.ambient", vec3(0.2f, 0.2f, 0.2f));
   myShader.setVec3("light.diffuse", vec3(0.5f, 0.5f, 0.5f));
   myShader.setVec3("light.specular", vec3(1.0f, 1.0f, 1.0f));

   vec3 emission = vec3(abs(sin(glfwGetTime())));
   myShader.setVec3("light.emission", emission);
   myShader.setVec3("light.position", lightPos);
   myShader.setVec3("viewPos", camera.Position);

   myShader.setFloat("movement", glfwGetTime() * 0.5);

   glDrawArrays(GL_TRIANGLES, 0, 36);
   glBindVertexArray(0);

   lightShader.Use();

   model = translate(model, lightPos);
   model = scale(model, resize);
   lightShader.setMat4("view", view);
   lightShader.setMat4("projection", projection);
   lightShader.setMat4("model", model);
   glBindVertexArray(lightVAO);
   glDrawArrays(GL_TRIANGLES, 0, 36);
   glBindVertexArray(0);

   glfwSwapBuffers(window);
}
对应的着色器代码是:
#version 330 core

in vec3 Normal;
in vec3 FragPos;
in vec2 myTex;

out vec4 color;

struct Material {
 sampler2D diffuse;
 sampler2D specular;
 sampler2D emission;
 float shininess;
};

struct Light {
 vec3 position;
 vec3 ambient;
 vec3 diffuse;
 vec3 specular;
 vec3 emission;
};

uniform vec3 viewPos;
uniform Material material;
uniform Light light;
uniform sampler2D sam;
uniform float movement;

void main(){
 float ambientStrength = 0.1;
 float specularStrength = 0.8;

 vec3 ambient = light.ambient * vec3(texture(material.diffuse, myTex));

 vec3 lightDir = normalize(light.position - FragPos);
 vec3 norm = normalize(Normal);
 float diff = max(dot(norm, lightDir), 0.0);
 vec3 diffuse = light.diffuse * (diff * vec3(texture(material.diffuse, myTex)));

 vec3 viewDir = normalize(viewPos - FragPos);
 vec3 reflectDir = reflect(-lightDir, norm);
 float spec = pow(max(dot(viewDir, reflectDir), 0.0), material.shininess);
 vec3 specular = light.specular * spec * vec3(texture(material.specular, myTex));

 vec3 emission = light.emission * vec3(texture(material.emission, vec2(myTex.x, myTex.y + movement)));

 vec3 result = ambient + diffuse + specular + emission;
 color = vec4(result, 1.0);
}
应该不难看懂,就不解释了。
光源
如标题所示,这节我们会讨论三种光:定向光(Directional Light),点光源(Point Light),聚光(Spotlight)。
定向光
如果光源位置足够远,我们就可以假设它的每条光线是平行的,现实中的例子就是太阳。

因为所有光线都平行,所以光源的位置就不重要了,因为对于场景中每一个物体,光的方向都是一致的,所以说代码里我们用光线方向来替代光源位置。
struct Light {
    // vec3 position; // 使用定向光就不再需要了
    vec3 direction;

    vec3 ambient;
    vec3 diffuse;
    vec3 specular;
};
...
void main()
{
  vec3 lightDir = normalize(-light.direction);
    //至于这里为什么要取反,请看之前计算漫反射的图
  ...
}
然后再在c++代码中设置direction就行了,对于direction的设计,可以用vec3也可以用vec4,正如之前提到过的四分量向量的第四个分量w,可以在glsl代码中检测,如果w为0就作为定向光处理,如果w为1就作为位置光处理。
点光源
点光源和位置光是特别像的,除了一点,衰减。
之前的位置光无论物体放在哪里,光线的强度都一样,这样是不符合物理常理的,而衰减(Attenuation)是会让光照强度随着距离而减少的一种线性方程: $$ F_{att}=\frac{1.0}{K_c+K_ld+K_qd^2} $$ 在这里d代表了片段距离光源的距离,而三个K则是我们为了计算衰减值的可配置数值:
- 常数项$K_c$通常为1,它的作用是保证分母永远大于1.
- 一次项以线性方式减少强度。
- 二次项在近距离时影响较小,远距离影响更大。
| 覆盖距离 | 常数项 | 一次项 | 二次项 |
|---|---|---|---|
| 7 | 1.0 | 0.7 | 1.8 |
| 13 | 1.0 | 0.35 | 0.44 |
| 20 | 1.0 | 0.22 | 0.20 |
| 32 | 1.0 | 0.14 | 0.07 |
| 50 | 1.0 | 0.09 | 0.032 |
| 65 | 1.0 | 0.07 | 0.017 |
| 100 | 1.0 | 0.045 | 0.0075 |
| 160 | 1.0 | 0.027 | 0.0028 |
| 200 | 1.0 | 0.022 | 0.0019 |
| 325 | 1.0 | 0.014 | 0.0007 |
| 600 | 1.0 | 0.007 | 0.0002 |
| 3250 | 1.0 | 0.0014 | 0.000007 |
代码很简单,只需要新加几个参数到结构体就行:
struct Light {
    vec3 position;

    vec3 ambient;
    vec3 diffuse;
    vec3 specular;

    float constant;
    float linear;
    float quadratic;
};

int main(){
    ...
    float distance    = length(light.position - FragPos);
    float attenuation = 1.0 / (light.constant + light.linear * distance + light.quadratic * (distance * distance));
    ambient  *= attenuation;
    diffuse  *= attenuation;
    specular *= attenuation;
}
聚光
聚光时位于一个特定位置朝着特定方向照射的光线,可以想象成手电筒和路灯。
在OpenGL中,聚光由一个世界坐标,一个方向和一个切光角(Cutoff Angle)来表示,切光角定义了圆锥的半径,对于每个片段,我们会计算它在不在切光方向之内。
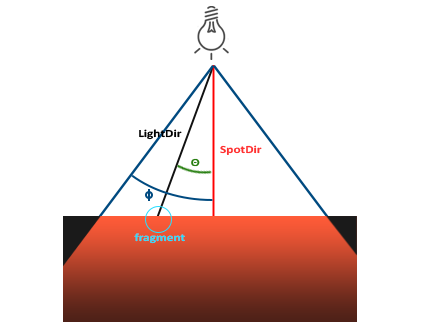
LightDir:从片段指向光源的向量。SpotDir: 聚光指向的方向。Phi$\phi$:切光角。Theta$\theta$ :LightDir和SportDir之间的夹角,如果在聚光范围内,这个角度应该要比$\phi$更小。
#version 330 core

in vec3 Normal;
in vec3 FragPos;
in vec2 myTex;

out vec4 color;

struct Material {
 sampler2D diffuse;
 sampler2D specular;
 float shininess;
};

struct Light {
 vec3 position;
 vec3 direction;
 float cutOff;

 vec3 ambient;
 vec3 diffuse;
 vec3 specular;

 float constant;
 float linear;
 float quadratic;
};

uniform vec3 viewPos;
uniform Material material;
uniform Light light;

void main(){
 vec3 lightDir = normalize(light.position - FragPos);
 float theta = dot(lightDir, normalize(-light.direction));
 vec3 ambient = light.ambient * vec3(texture(material.diffuse, myTex));
 vec3 result;
 if(theta > light.cutOff){
     //唯一需要注意的一点,为什么这里是>号
     //原因是我们在这里用的是cos,cos里,越接近1的数值,角度越小,如果对此有疑问请查看cos函数的图像
     vec3 norm = normalize(Normal);
     float diff = max(dot(norm, lightDir), 0.0);
     vec3 diffuse = light.diffuse * diff * vec3(texture(material.diffuse, myTex));

     vec3 viewDir = normalize(viewPos - FragPos);
     vec3 reflectDir = reflect(-lightDir, norm);
     float spec = pow(max(dot(viewDir, reflectDir), 0.0), material.shininess);
     vec3 specular = light.specular * spec * vec3(texture(material.specular, myTex));

     float distance    = length(light.position - FragPos);
     float attenuation = 1.0 / (light.constant + light.linear * distance + light.quadratic * (distance * distance));

     diffuse   *= attenuation;
     specular *= attenuation;

     result = ambient + diffuse + specular;
 } else {
     result = ambient;
 }

 color = vec4(result, 1.0);
}
然而这样的效果还不够真实,主要原因光的边缘太硬了,真实的效果应该是越接近聚光方向的光强越大,约边缘光强越弱,这时候就要用到这个函数: $$ I = \frac{\theta - \gamma}{\epsilon} $$ 这里$\epsilon=\phi-\gamma$,内圆锥和外圆锥的余弦值差,最后的结果是当前片段的聚光强度。
| $\theta$ | $\theta$(角度) | $\phi$(内光切) | $\phi$(角度) | $\gamma$(外光切) | $\gamma$(角度) | $\epsilon$ | $I$ |
|---|---|---|---|---|---|---|---|
| 0.87 | 30 | 0.91 | 25 | 0.82 | 35 | 0.91 - 0.82 = 0.09 | 0.87 - 0.82 / 0.09 = 0.56 |
| 0.9 | 26 | 0.91 | 25 | 0.82 | 35 | 0.91 - 0.82 = 0.09 | 0.9 - 0.82 / 0.09 = 0.89 |
| 0.97 | 14 | 0.91 | 25 | 0.82 | 35 | 0.91 - 0.82 = 0.09 | 0.97 - 0.82 / 0.09 = 1.67 |
| 0.83 | 34 | 0.91 | 25 | 0.82 | 35 | 0.91 - 0.82 = 0.09 | 0.83 - 0.82 / 0.09 = 0.11 |
| 0.64 | 50 | 0.91 | 25 | 0.82 | 35 | 0.91 - 0.82 = 0.09 | 0.64 - 0.82 / 0.09 = -2.0 |
| 0.966 | 15 | 0.9978 | 12.5 | 0.953 | 17.5 | 0.966 - 0.953 = 0.0448 | 0.966 - 0.953 / 0.0448 = 0.29 |
可以看到,越接近边缘,$I$越接近1,反之越大,最后给出代码,应该不难理解:
    // spotlight (soft edges)
    float theta = dot(lightDir, normalize(-light.direction));
    float epsilon = (light.cutOff - light.outerCutOff);
    float intensity = clamp((theta - light.outerCutOff) / epsilon, 0.0, 1.0);
    //clamp 保证最后结果在0 - 1之间
    diffuse  *= intensity;
    specular *= intensity;

    // attenuation
    float distance    = length(light.position - FragPos);
    float attenuation = 1.0 / (light.constant + light.linear * distance + light.quadratic * (distance * distance));
    ambient  *= attenuation;
    diffuse   *= attenuation;
    specular *= attenuation;
多光源
最后,我们把之前学过的几个光源封装成函数,这样就方便多光源的整合计算了。
定向光
结构体
struct DirLight{
    vec3 direction;
    vec3 ambient;
    vec3 diffuse;
    vec3 specular;
}
封装函数
vec3 CalcDirLight(DirLight light, vec3 normal, vec3 viewDir)
{
    vec3 lightDir = normalize(-light.direction);
    // 漫反射着色
    float diff = max(dot(normal, lightDir), 0.0);
    // 镜面光着色
    vec3 reflectDir = reflect(-lightDir, normal);
    float spec = pow(max(dot(viewDir, reflectDir), 0.0), material.shininess);
    // 合并结果
    vec3 ambient  = light.ambient  * vec3(texture(material.diffuse, TexCoords));
    vec3 diffuse  = light.diffuse  * diff * vec3(texture(material.diffuse, TexCoords));
    vec3 specular = light.specular * spec * vec3(texture(material.specular, TexCoords));
    return (ambient + diffuse + specular);
}
点光源
结构体
struct PointLight {
    vec3 position;

    float constant;
    float linear;
    float quadratic;

    vec3 ambient;
    vec3 diffuse;
    vec3 specular;
};
封装函数
vec3 CalcPointLight(PointLight light, vec3 normal, vec3 fragPos, vec3 viewDir)
{
    vec3 lightDir = normalize(light.position - fragPos);
    // 漫反射着色
    float diff = max(dot(normal, lightDir), 0.0);
    // 镜面光着色
    vec3 reflectDir = reflect(-lightDir, normal);
    float spec = pow(max(dot(viewDir, reflectDir), 0.0), material.shininess);
    // 衰减
    float distance    = length(light.position - fragPos);
    float attenuation = 1.0 / (light.constant + light.linear * distance +
                 light.quadratic * (distance * distance));
    // 合并结果
    vec3 ambient  = light.ambient  * vec3(texture(material.diffuse, TexCoords));
    vec3 diffuse  = light.diffuse  * diff * vec3(texture(material.diffuse, TexCoords));
    vec3 specular = light.specular * spec * vec3(texture(material.specular, TexCoords));
    ambient  *= attenuation;
    diffuse  *= attenuation;
    specular *= attenuation;
    return (ambient + diffuse + specular);
}
聚光
结构体
struct SpotLight {
    vec3 position;
    vec3 direction;
    float cutOff;
    float outerCutOff;

    float constant;
    float linear;
    float quadratic;

    vec3 ambient;
    vec3 diffuse;
    vec3 specular;
};
封装函数
vec3 CalcSpotLight(SpotLight light, vec3 normal, vec3 fragPos, vec3 viewDir)
{
    vec3 lightDir = normalize(light.position - fragPos);
    // diffuse shading
    float diff = max(dot(normal, lightDir), 0.0);
    // specular shading
    vec3 reflectDir = reflect(-lightDir, normal);
    float spec = pow(max(dot(viewDir, reflectDir), 0.0), material.shininess);
    // attenuation
    float distance = length(light.position - fragPos);
    float attenuation = 1.0 / (light.constant + light.linear * distance + light.quadratic * (distance * distance));
    // spotlight intensity
    float theta = dot(lightDir, normalize(-light.direction));
    float epsilon = light.cutOff - light.outerCutOff;
    float intensity = clamp((theta - light.outerCutOff) / epsilon, 0.0, 1.0);
    // combine results
    vec3 ambient = light.ambient * vec3(texture(material.diffuse, TexCoords));
    vec3 diffuse = light.diffuse * diff * vec3(texture(material.diffuse, TexCoords));
    vec3 specular = light.specular * spec * vec3(texture(material.specular, TexCoords));
    ambient *= attenuation * intensity;
    diffuse *= attenuation * intensity;
    specular *= attenuation * intensity;
    return (ambient + diffuse + specular);
}
投影纹理
本章最后补充一个知识点,投影纹理。
投影纹理的效果就和现实中的投影仪一样,可以将图片映射到物体上。
首先,我们以投影源位置为中心定义一个坐标系统,因为经过投影变换的点的范围是[-1,1],所以要通过以下的变换将其转换成范围为[0,1]的UV坐标,变换矩阵如下:
$$
M=\left[
\begin{array}{cccc}
0.5 & 0 & 0 & 0.5 \\\
0 & 0.5 & 0 & 0.5 \\\
0 & 0 & 0.5 & 0.5 \\\
0 & 0 & 0 & 1
\end{array}
\right]PV
$$
其中P为透视矩阵,V为投影源的LookAt矩阵。
想象一下不难解释为什么需要用到透视矩阵(实际上正交也可以,但是效果不真实),投影的几何体和摄像机的几何体都是锥体。

最后附上关键代码:
mat4 projScaleTran = mat4(1.0f);
projScaleTran = translate(projScaleTran, vec3(0.5f));
projScaleTran = scale(projScaleTran, vec3(0.5f));
...
while(...){
    ...
    mat4 m = projScaleTran * perspective(30.0f, 1.0f, 0.2f, 1000.0f) * camera.GetViewMatrix();
    myShader.setMat4("projectorMatrix", m);
    ...
}
//vertex
 ProjTexCoord = projectorMatrix * (model * vec4(position, 1.0f));
 //要随着物体,物体空间变换到世界空间,所以这一步是必要的
//fragment
 vec4 projTexColor = vec4(0.0);
 projTexColor = textureProj(material.projectorTex, ProjTexCoord);
Assimp
在导入模型之前,我们先要了解一个模型导入库:Assimp。Assimp可以导入多种不同的模型格式,并将模型数据加载到它的通用数据结构中,加载完之后,我们就可以从这个数据结构中读取我们需要的数据了。
一个模型通常包括多个网格,通常每个模型都由几个子模型、形状组合而成,每个单独的形状就是一个网格。网格是OpenGL中绘制物体所需的最小单位(顶点数据,索引,材质属性)。

- 和材质于网格一样,所有的场景、模型都包含在Scene对象中,Scene对象也包括了对根节点的引用。
- 根节点可能包括一些列指向场景对象中存储的网格数据的索引
mMeshes的子节点,mMeshes下存储了真正的Mesh对象。 - 一个Mesh对象本身包括了渲染所需要的所有数据,包括顶点向量,法向量,纹理坐标,面和物体的材质。
- 一个网格包含了多个面,一个面包含了组成物体的渲染图元(三角,方形,点)的顶点的索引,所以利用EBO来渲染非常简单。
- 如上一条提到,网格是包括Material对象的,它包含了一些函数让我们能获取到物体的材质属性。
网格
正如上一节所说,网格代表的是单个可绘制的实体,回想一下网格需要的数据:一系列顶点,每个顶点拥有对应的的位置向量,法向量和纹理坐标向量。用于索引绘制的索引和纹理形式的材质数据。
//
// Created by herain on 7/12/21.
//

#ifndef OPENGL_MESH_H
#define OPENGL_MESH_H

#include <glm/glm.hpp>
#include <glm/gtc/matrix_transform.hpp>
#include <string>
#include <vector>
#include "Shader.h"

using namespace glm;
using namespace std;

struct Vertex{
   vec3 Position;
   vec3 Normal;
   vec2 TexCoords;
};

struct Texture{
   unsigned int id;
   //这个id指的是以前我们用SOIL读取图片之后的返回值,即索引texture的值
   string type;
   //这个type会指明这个材质是漫反射还是镜面反射,之后这个会被用于命名
   string path;
};

class Mesh{
public:
   //网格数据
   vector<Vertex> vertices;
   vector<unsigned int> indices;
   vector<Texture> textures;
   //函数
   Mesh(vector<Vertex> vertices, vector<unsigned int> indices, vector<Texture> textures);
   void Draw(Shader shader);

private:
   //渲染数据
   unsigned int VAO, VBO, EBO;
   //函数
   void setupMesh();
};

Mesh::Mesh(vector<Vertex> vertices, vector<unsigned int> indices, vector<Texture> textures){
   this->vertices = vertices;
   this->indices = indices;
   this->textures = textures;
   setupMesh();
}

void Mesh::setupMesh() {
   glGenVertexArrays(1, &VAO);
   glGenBuffers(1, &VBO);
   glGenBuffers(1, &EBO);

   glBindVertexArray(VAO);
   glBindBuffer(GL_ARRAY_BUFFER, VBO);
   glBufferData(GL_ARRAY_BUFFER, vertices.size() * sizeof(Vertex), &vertices[0], GL_STATIC_DRAW);

   glBindBuffer(GL_ELEMENT_ARRAY_BUFFER, EBO);
   glBufferData(GL_ELEMENT_ARRAY_BUFFER, indices.size() * sizeof(unsigned int), &indices[0], GL_STATIC_DRAW);

   glEnableVertexAttribArray(0);
   glVertexAttribPointer(0, 3, GL_FLOAT, GL_FALSE, sizeof(Vertex), (void*) 0);

   glEnableVertexAttribArray(1);
   glVertexAttribPointer(1, 3, GL_FLOAT, GL_FALSE, sizeof(Vertex), (void*) offsetof(Vertex, Normal));

   glEnableVertexAttribArray(2);
   glVertexAttribPointer(2, 2, GL_FLOAT, GL_FALSE, sizeof(Vertex), (void*) offsetof(Vertex, TexCoords));

   glBindVertexArray(0);
}

void Mesh::Draw(Shader shader) {
   unsigned int diffuseNr = 1;
   unsigned int specularNr = 1;
   for(unsigned int i = 0; i < textures.size(); i++){
       glActiveTexture(GL_TEXTURE0 + i);
       string number;
       string name = textures[i].type;
       if(name == "texture_diffuse")
           number = to_string(diffuseNr++);
       else if(name == "texture_specular")
           number = to_string(specularNr++);

       shader.setFloat(("material."+name+number).c_str(), i);
       //每个漫反射纹理会被命名为texture_diffuseN,每个镜面反射纹理会被命名为texture_specularN
       glBindTexture(GL_TEXTURE_2D, textures[i].id);
       //将纹理数据传入到缓冲中,此时缓冲绑定着某个纹理
   }
   glActiveTexture(GL_TEXTURE0);

   glBindVertexArray(VAO);
   glDrawElements(GL_TRIANGLES, indices.size(), GL_UNSIGNED_INT, 0);
   glBindVertexArray(0);
}

#endif //OPENGL_MESH_H
模型
如之前所说,一个模型是由多个网格构成的,所以在模型类中,就一定会包含一个网格的vector。在这一节中,我们会学习如何将3D模型转换成Mesh对象。
#ifndef MODEL_H
#define MODEL_H

#include <glm/glm.hpp>
#include <glm/gtc/matrix_transform.hpp>
#include <stb/stb_image.h>
#include <assimp/Importer.hpp>
#include <assimp/scene.h>
#include <assimp/postprocess.h>

#include <string>
#include <fstream>
#include <sstream>
#include <iostream>
#include <map>
#include <vector>
#include "Mesh.h"

using namespace std;

unsigned int TextureFromFile(const char *path, const string &directory);

class Model
{
public:
   vector<Texture> textures_loaded;
    //存储已经加载过的贴图,因为很多情况下同一张贴图会被用很多次,所以不重复加载贴图能在一定程度上提升性能
   vector<Mesh>    meshes;
   string directory;

   Model(string const &path, bool gamma = false)
   {
       loadModel(path);
   }

   void Draw(Shader &shader)
   {
       for(unsigned int i = 0; i < meshes.size(); i++)
           meshes[i].Draw(shader);
   }
    //渲染模型实际上就是把它下面的网格一个个都绘制好

private:
   void loadModel(string const &path)
   {
       Assimp::Importer importer;
       const aiScene* scene = importer.ReadFile(path, aiProcess_Triangulate|aiProcess_GenSmoothNormals|aiProcess_FlipUVs);
       //声明了一个加载器,用于加载模型,正如之前提到过,大部分信息都会存在scene里面
       //aiProcess_Triangulate表示如果模型不是完全由三角形组成,就先把它们变成三角形
       //aiProcess_GenSmoothNormals给所有顶点生成平滑的法线
       //aiProcess_FlipUVs会反转贴图的y轴,因为OpenGL里面很多图像都是反的
       //aiProcess_GenNormals如果模型不包含法线就为每个顶点创建法线
       //aiProcess_SplitLargeMeshes将大的网格分成小网格
       //aiProcess_OptimizeMeshes将小网格合并为大的网格,减少绘制调用次数
       //更多的flags可以在这里找到:http://assimp.sourceforge.net/lib_html/postprocess_8h.html
       if(!scene || scene->mFlags & AI_SCENE_FLAGS_INCOMPLETE || !scene->mRootNode)
       {
           cout << "ERROR::ASSIMP:: " << importer.GetErrorString() << endl;
           return;
       }
       //在这一步我们会检查场景和根节点有没有正确读取,以及用一个标记来检查数据完不完整

       directory = path.substr(0, path.find_last_of('/'));
       processNode(scene->mRootNode, scene);
       //将根节点传入递归的函数一个个处理
   }

   void processNode(aiNode *node, const aiScene *scene)
   {
       for(unsigned int i = 0; i < node->mNumMeshes; i++)
       {
           aiMesh* mesh = scene->mMeshes[node->mMeshes[i]];
           meshes.push_back(processMesh(mesh, scene));
           //处理当前节点下的每一个网格,并把处理完的网格存储起来
       }

       for(unsigned int i = 0; i < node->mNumChildren; i++)
       {
           processNode(node->mChildren[i], scene);
           //递归处理下面的节点
       }

   }

    //下面是将aimesh对象转换成我们自己的网格对象,我们需要访问网格的相关属性并把它们对应放进我们的对象中
   Mesh processMesh(aiMesh *mesh, const aiScene *scene)
   {
       vector<Vertex> vertices;
       vector<unsigned int> indices;
       vector<Texture> textures;

       //对于网格下每一个节点,我们逐个处理
       for(unsigned int i = 0; i < mesh->mNumVertices; i++)
       {
           Vertex vertex;
           glm::vec3 vector;

           //将节点位置读取出来
           vector.x = mesh->mVertices[i].x;
           vector.y = mesh->mVertices[i].y;
           vector.z = mesh->mVertices[i].z;
           vertex.Position = vector;

           //如果有法线,就把法线数据读取出来
           if (mesh->HasNormals())
           {
               vector.x = mesh->mNormals[i].x;
               vector.y = mesh->mNormals[i].y;
               vector.z = mesh->mNormals[i].z;
               vertex.Normal = vector;
           }

           //如果有纹理信息,就把纹理位置信息读取出来,在这里我们假设只会用到一组纹理位置,请不要搞混这里的纹理位置和纹理,纹理位置是描述了纹理应该怎么贴,纹理是描述了贴什么
           if(mesh->mTextureCoords[0])
           {
               glm::vec2 vec;
               vec.x = mesh->mTextureCoords[0][i].x;
               vec.y = mesh->mTextureCoords[0][i].y;
               vertex.TexCoords = vec;
           }
           else
               vertex.TexCoords = glm::vec2(0.0f, 0.0f);
           vertices.push_back(vertex);
       }

       //在Assimp中,每一个面代表了一个图元,我们之前定义过,所以在这个示例中,图元永远是三角形
       //一个面包括了多个索引,索引描述了我们绘制面的顺序,我们只需要把这些顺序存起来就行了
       for(unsigned int i = 0; i < mesh->mNumFaces; i++)
       {
           aiFace face = mesh->mFaces[i];
           for(unsigned int j = 0; j < face.mNumIndices; j++)
               indices.push_back(face.mIndices[j]);
       }

       //下面处理材质
       aiMaterial* material = scene->mMaterials[mesh->mMaterialIndex];
       //下面我们假设采样器的名字为texture_材质类型N
       // diffuse: texture_diffuseN
       // specular: texture_specularN
       // normal: texture_normalN

       //纹理的索引被存在mMaterials里,下面我们从mMaterials中读取对应的贴图
       // 1. diffuse maps
       vector<Texture> diffuseMaps = loadMaterialTextures(material, aiTextureType_DIFFUSE, "texture_diffuse");
       textures.insert(textures.end(), diffuseMaps.begin(), diffuseMaps.end());
       // 2. specular maps
       vector<Texture> specularMaps = loadMaterialTextures(material, aiTextureType_SPECULAR, "texture_specular");
       textures.insert(textures.end(), specularMaps.begin(), specularMaps.end());

       return Mesh(vertices, indices, textures);
       //返回网格信息
   }


   vector<Texture> loadMaterialTextures(aiMaterial *mat, aiTextureType type, string typeName)
   {
       vector<Texture> textures;
       for(unsigned int i = 0; i < mat->GetTextureCount(type); i++)
       {
           //这里GetTextureCount会检测储存在材质中纹理的数量
           aiString str;
           mat->GetTexture(type, i, &str);
           //获取具体文件的位置
           bool skip = false;

           //下面会在textures_loaded里面找有没有同样路径的贴图,如果有就代表已经加载过了
           for(unsigned int j = 0; j < textures_loaded.size(); j++)
           {
               if(std::strcmp(textures_loaded[j].path.data(), str.C_Str()) == 0)
               {
                   textures.push_back(textures_loaded[j]);
                   skip = true;
                   break;
               }
           }
           if(!skip)
           {
               //如果还没加载过则加载
               Texture texture;
               texture.id = TextureFromFile(str.C_Str(), this->directory);
               texture.type = typeName;
               texture.path = str.C_Str();
               textures.push_back(texture);
               textures_loaded.push_back(texture);
           }
       }
       return textures;
   }
};


unsigned int TextureFromFile(const char *path, const string &directory)
{
   string filename = string(path);
   filename = directory + '/' + filename;

   unsigned int textureID;
   glGenTextures(1, &textureID);

   int width, height, nrComponents;
   unsigned char *data = stbi_load(filename.c_str(), &width, &height, &nrComponents, 0);
   if (data)
   {
       GLenum format;
       if (nrComponents == 1)
           format = GL_RED;
       else if (nrComponents == 3)
           format = GL_RGB;
       else if (nrComponents == 4)
           format = GL_RGBA;

       glBindTexture(GL_TEXTURE_2D, textureID);
       glTexImage2D(GL_TEXTURE_2D, 0, format, width, height, 0, format, GL_UNSIGNED_BYTE, data);
       glGenerateMipmap(GL_TEXTURE_2D);

       glTexParameteri(GL_TEXTURE_2D, GL_TEXTURE_WRAP_S, GL_REPEAT);
       glTexParameteri(GL_TEXTURE_2D, GL_TEXTURE_WRAP_T, GL_REPEAT);
       glTexParameteri(GL_TEXTURE_2D, GL_TEXTURE_MIN_FILTER, GL_LINEAR_MIPMAP_LINEAR);
       glTexParameteri(GL_TEXTURE_2D, GL_TEXTURE_MAG_FILTER, GL_LINEAR);

       stbi_image_free(data);
   }
   else
   {
       std::cout << "Texture failed to load at path: " << path << std::endl;
       stbi_image_free(data);
   }

   return textureID;
}
#endif
后记
到此为止第二部分翻译和改编也完成了,下面的内容会更深入地讨论一些关于着色器的问题